Running the Jespa Start executable jar is a quick and easy way to see SSO with SPNEGO / Kerberos working in your environment.
Jespa Start is a Jetty 12 embedded application that runs the Jespa HttpSecurityService filter for Windows Silent SSO, a login servlet for manual form-based logins and a simple servlet that displays detailed data about the authenticated user.
Jespa Start is completely self-contained. To run it, just go to the Downloads page at https://www.ioplex.com/, download the jespa-start-2.1.10.zip package, unzip it and run the enclosed executable jar with the name of a properties file to be created like:
$ java -jar jespa-start-2.1.10.jar jespa1.prp
Alternatively, use one of the included run scripts which might be convenient for adjusting the runtime environment (like setting the full path to java if necessary).
The specified properties filename base (jespa1 in this example) will also be used as the default Computer account name. Choose a name that is no more than 15 ASCII characters and digits.
Jespa Start runs the Jespa HssSetup console menu program which, when supplied with a valid URL, runs Jetty.
Note: The domain of the hostname of the URL must be an AD DNS domain or alternative UPN suffx or clients may fallback to NTLM. Specifically, while a KDC will issue a ticket for an SPN found in it's own domain, it will not return a cross realm referral if the hostname domain does not match any known AD DS domain or alternative UPN suffix.
If the specified .prp file did not already exist, HssSetup will create it and start in a "Wizard Mode" which:
After "wizard" mode completes, or if the .prp already existed, HssSetup runs in regular menu mode.
To shutdown Jetty and exit HssSetup, enter .<enter>.
See also: The HssSetup Console Menu Program
The following command dialog is a complete example of running Jespa Start on Linux with the run.sh script:
$ unzip jespa-start-2.1.10.zip
$ cd jespa-start-2.1.10
$ ./run.sh jespa1.prp
--
HttpSecurityService Setup / Jespa 2.1.10
AD DS DNS domain: mega.corp
DcLocator failed to resolve domain: mega.corp
Windows DNS server IP: 10.44.100.22
DcLocator selected DC: dc3b.mega.corp
Computer account name [jespa1]:
Enter the HTTPS URL that will be used by most clients exactly as it will appear in the address bar of a browser. HssSetup will attempt to retrieve the TLS certificate from the TCP server and port specified in the URL.
  Browser URL: https://rkyas15.mega.corp:8443
Generating 2,048 bit RSA key pair and self-signed certificate (SHA256withRSA) with a validity of 3,650 days
        for: CN=rkyas15.mega.corp
  CN=jespa1:
    objectClass: [computer]
    sAMAccountName: jespa1$
    name: jespa1
    msDS-SupportedEncryptionTypes: 0x00000010 aes256-cts-hmac-sha1-96
    servicePrincipalName: [HTTP/rkyas15.mega.corp]
Create Computer account jespa1$ in domain mega.corp? [y]:
username: mega.corp\Administrator
password: **********
--
Please select a suitable Computer account container:
c) Cancel
m) Manually enter container DN
1) CN=Computers,DC=mega,DC=corp
2) OU=basn,DC=mega,DC=corp
> 2
Successfully created new Computer account
--
      provider.classname: jespa.spnego.SpnegoSecurityProvider
dns)   jespa.dns.servers: 10.44.100.22
site)     jespa.dns.site: BASNA
url)   bindings.cert.url: https://rkyas15.mega.corp:8443
      bindings.cert.hash: FF418B8D43570EEEF985F237B04E72F1
spn) bindings.targetSpns: HTTP/rkyas15.mega.corp,HTTP/10.44.55.73,HTTP/localhost,HTTP/127.0.0.1
  jespa.service.acctname: jespa1$@mega.corp
  jespa.service.password: r^2W****************************
HSS SETUP / jespa1.prp
P) Password change
R) Password reset
v) Validate
s) Save
.) Exit
>
At this point, Jespa Start is running. However, before trying to visit the site, you will probably need to adjust browser client settings and open a firewall port.
A client will not initiate silent SSO (Kerberos or NTLM) unless the target URL is added the client browser settings. Normally this is handled using a GPO. But for testing individual clients, search for and run inetcpl.cpl on the client, select Security > Local intranet > Sites and add the scheme and host of the target URL (like https://rkyas15.mega.corp in this example).
Otherwise, the user will be prompted to manually enter credentials into a credential dialog (browser dialog or click Cancel and use the Jespa Start Sign in dialog).
Also, it will likely be necessary to add a firewall rule on the server hosting Jespa Start to open the TCP port of the target URL.
The command for opening a port on Linux varies with distribution but for firewalld based systems like RHEL, the following might work (maybe leave off the --permanent if you're just testing this once).
# firewall-cmd --add-port=8443/tcp --permanent
For an iptables based system like Ubuntu, the following might work:
# iptables -A INPUT -p tcp --deport 8443 -j ACCEPT
On Windows, the following PowerShell command should open port 8443:
PS>New-NetFirewallRule -DisplayName 'Allow TCP 8443' -Profile Domain -Direction inbound -Action Allow -Protocol TCP -LocalPort 8443
To run PowerShell as Administrator, search for "powershell", right-click on the PowerShell app, select "Run as Administrator" and enter suitable credentials.
Now you are ready to visit the jespa-start resource with a URL like:
https://rkyas15.mega.corp:8443/jespa-start
In this example, the result might look like this:
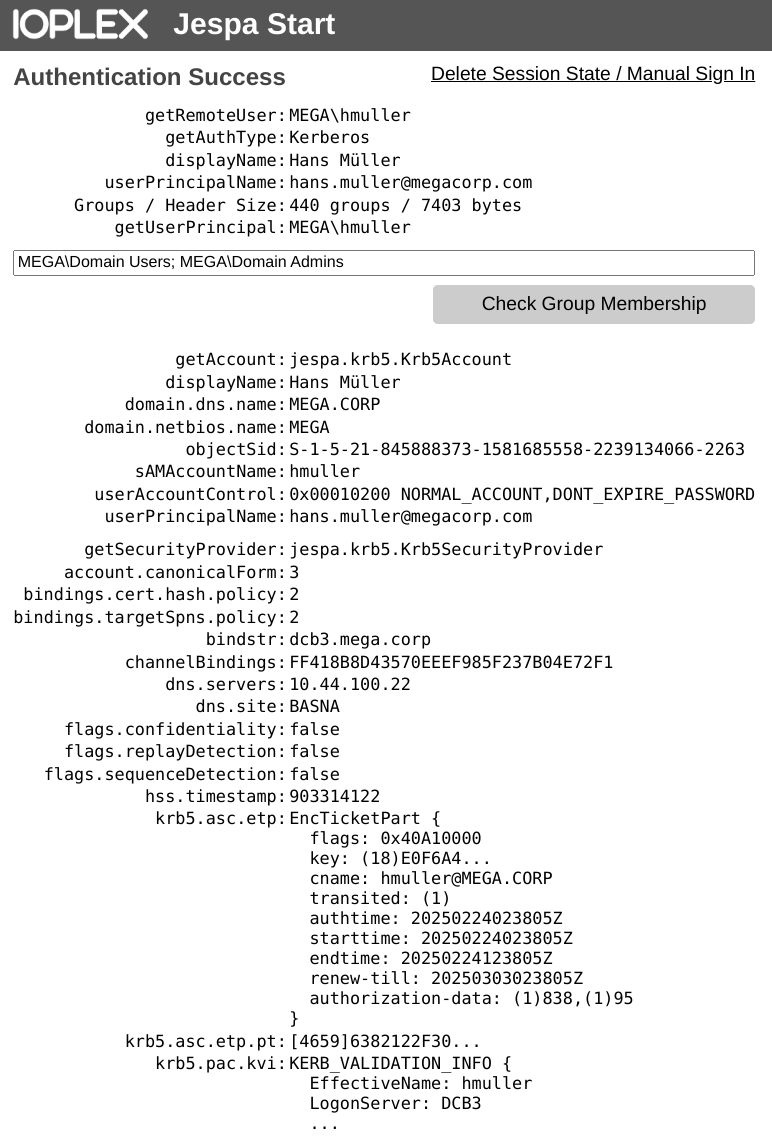
To manually enter alternative credentials, select Delete Session State / Manual Sign In. The Sign in dialog looks like this:
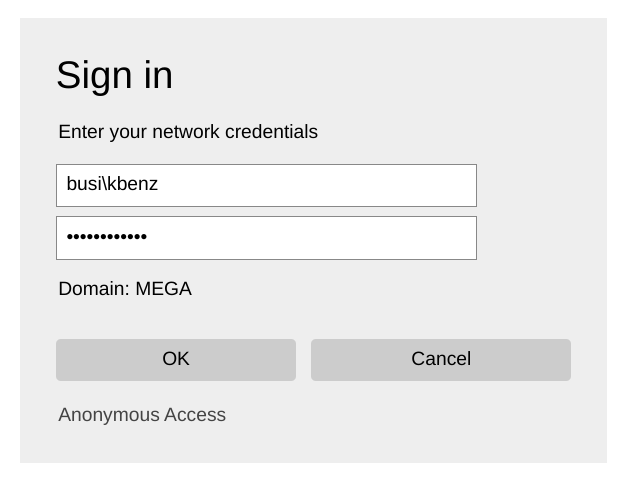
To re-trigger Silent SSO when testing different properties and settings, select Cancel at the Sign in dialog.
The now validated HSS properties file and AD DS Computer account can also be used with your specific application.
Note: Using https://localhost:8443/ or a similar non-DNS name will work but only with NTLM. For Kerberos SSO to work, you must use the URL with the hostname from the first SPN in the bindings.targetSpns list (https://rkyas15.mega.corp:8443/ in this example).
See also: Run the Jespa Start Webapp
See also: Install the HttpSecurityService for Windows Silent SSO with SPNEGO
See also: Possible Issues using the HttpSecurityService